For Promoters: How to Set Up or Edit a Race Event
Setting up your race event in RaceReady's system is important to get right. Let's show you how.
Create your RaceReady Promoter Account and set up your Stripe Account (here's how to set up your promoter account if you've not done so yet)
Create / Edit your Custom Classes (here's how to create or edit your custom classes)
Create / Edit any Passes or Club Memberships necessary to register for the event (here's how to create or edit your passes or club memberships)
Once those steps are done (don't worry—they typically need to be done only one time), then you'll have the necessary pieces ready to create a new event.
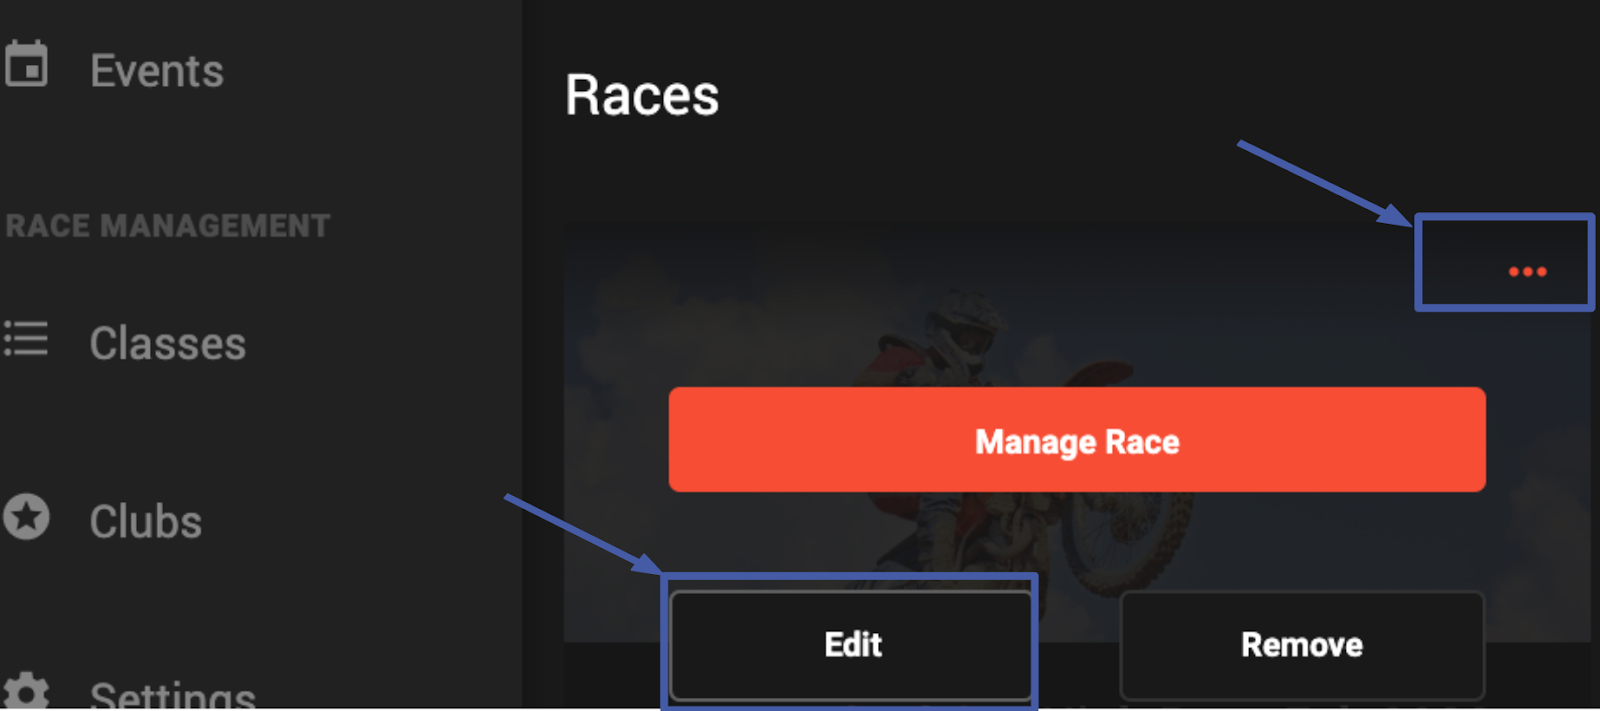
Edit an Existing Event
To edit an existing event, click on the Events tab, find the event you wish to edit, click the menu icon on its top right corner, and select "edit")
Once selected, access any portion of the event (as documented below) and modify any portion necessary, and click save. This article will now focus on how to create an event from the beginning.
Create a New Event
From your dashboard, select "Events" on the lefthand menu, and select the Create button.


From here, you can create a series of events, or just a single event. If it's your first time, we recommend creating a single event.
Next, Select an image to be featured on the registration page, name the race, create a public URL, and pick the dates of the race.
(for the custom URL field, whatever you input to this field will be appended to the end of https://app.iraceready.com/event/)

Choose what days that have required fees and what time online registration closes.

If a racer must pay separate registration fees for each day, then select "Requires Fees" next to each day on this list that will have separately charged entry fees.
If instead a single registration applies to more than one day, just select "Requires Fees" for the first day in the list. This will make it so racers will only have to purchase one entry fee per class, and it will be valid for each day of the event.
Next, choose a previous race location or click Add a New Location for a new track. Once you create a new location, you can select it from the dropdown list.

Next, add your event description, contact information, phone number, email and website (you can use a facebook page if you don't have a website).

Click the "Next" button at the bottom of the screen:

After finishing the items on the Basic tab, you'll be taken to the Pricing tab where you set prices and fees. Here, you can add any number of additional items:
-Season Pass to apply to this event, if desired
-Membership (or memberships) that must be purchased as part of registration for this event
-Registration Fees, for anything you wish to charge besides race entries. (E.g. practices, wrist bands, group meals you offer, etc.) You can also use the "Forward Fees To" field to designate who should receive the fees—whether your organization, or another organization.
-Campsites, if applicable

-Add camping options by selecting "Add Options" in the camping section, and filling out the form. You can create a pick list of campsites to hold in inventory on this form, by typing in the name of each campsite in the "Add Site" field, and pressing enter. It will populate in the list below once you do.
We recommend uploading an image of the numbered campsites here as well.

Once you've finished creating your fees, select the "Next" button at the bottom of the form. This will take you to the Format tab, where you set up the race format:


Set the number of laps to the highest number you expect to have in any one race during the event. Don't worry--if you have to add an extra lap or two last-minute, this won't prevent you from doing so. It will just add the checkered flag icon to the live timing feed once a racer reaches that number lap in their race. Final results are not reliant on this value however.
Also, "Gate Choice" lets you determine how to allocate the gate pick for the first moto. Subsequent motos will allocate gate choice based on the prior moto's results, as is usual.
The points table allows you to select the "Default" (AMA Standard Scoring) points table. RaceReady is preparing the option to build your own points table from this tool as well—watch for a "Create Points Table" option on this dropdown.


Once you select "Next", you can select which classes you'll offer at this event. You should have created your custom classes previously, in the "Classes" tab on the lefthand menu. Select as many classes as you plan to offer at this event, and set their fees as appropriate. Click "Add Classes":

Then select which classes you which to include:

Once you select "Next", you can manage your waivers for this event. Select "Add Waiver" and create a new waiver by uploading a file and giving it a name:


Once complete, advance to the final step: Review. From here, you can review the details, publish the event to make it live immediately, or simply save it to make it live at a later date. Copy your Shareable URL, and spread the news far and wide!

Related Articles
For Promoters: How to Create or Edit Custom Classes
You can build your own custom class list, which racers can choose from when signing up for your events. Once you build your list of race classes, you always have them in RaceReady to use in any event you create. Here's how. Also, if you need to edit ...For Promoters: How To Un-publish or Hide an Event?
To prevent your event from being viewable by the public, follow these instructions. If you have an event that, for some reason, you have previously published and wish to un-publish, here's what you need to do. Log in to your promoter account, and ...For Promoters: How to Change Registration Details for a Racer—Edit or Add a Bike or Class Entry
If you need to help a racer change something on their race registration (either which bike / vehicle they registered to use, or which class entries they signed up to be in), here's what you need to do: Log in to your promoter account, find the event ...For Promoters: How Can I Manually Adjust Scores and Race Results?
Sometimes you have to adjust a rider's score. Here's how. We make it easy to adjust scores and results for any racer in your event. First, if you just want to adjust scores, here's a great article that shows you how to manually score an event, and it ...For Promoters: Sample Wording for Event Information
To help you get an idea of what's typically included in the Race Information field, or the Confirmation Email field, here are some generic examples. 1. Race Information Field: Welcome to the 2021 LFPMX Series at Mapleton MX Park. NOTE: ...